 The most important part of any event is the attention detail, and this bride left no corner untouched. However I may have a biased opinion, since that bride was me. None the less, I had a vision and I made sure that vision transcended throughout the entire event. Every piece of paper matched and served a purpose, while every detail fit the theme. Touches of textured flowers, bits of bling and bows mixed together to create the most beautifully romantic yet fun and girly day of my life. [Read more…]
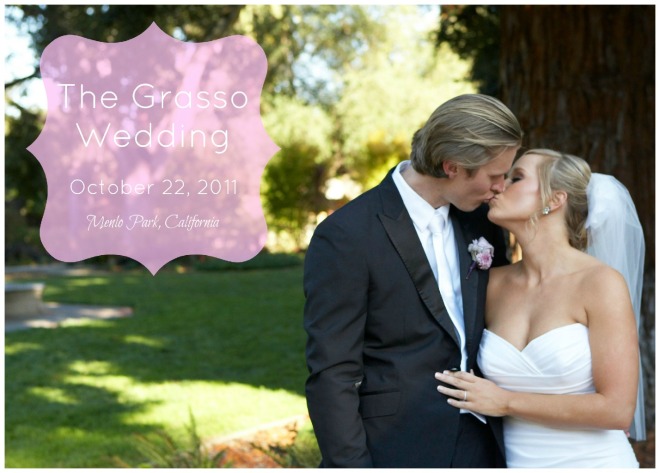
Northern California Pink and Purple Wedding
July 25, 2012 by 3 Comments
Inspiration Board – Mad Hatter Tea Party
January 24, 2012 by Leave a Comment

One of the worst things about getting married is you can’t plan your own showers. I would have loved to have a Mad Hatter Tea Party! I guess one of my lucky engaged girlfriends will get one instead… I pretty much have it all planned. I am just waiting on the boyfriends to pop the question. I got the idea when Taylor, of the Real Housewives of Beverly Hills, threw a Mad Hatter Unbirthday Party for her daughter last season. It was divine and over the top. I loved every minute of it. My party will obviously have to be downsized a bit, simply because my budget is a tad tighter than hers, but I am sure I can get creative and make it amazing. It is a perfect opportunity to stretch my DIY muscles.
1. Misdirectional Signs // 2. Eat Me Tags // 3. Personalized Hats // 4. DIY Croquet Sticks // 5. Drink Me Tags // 6. Eat Me Desserts
Inspiration Board – Rustic Wedding
January 23, 2012 by Leave a Comment

1. Chalkboard Door: Making your own chalkboard door is super simple CLICK HERE to learn how.
2. Dark Brown Balsa Wood Flower Cake: When it came to making my wedding cake, I was inspired by the ladies and dudes over at Sweet and Saucy Shop in Long Beach, CA. They are also responsible for this lovely cake. You have to check out their website. They are some of the most talented cake designers I have ever seen.
3: Redneck Wineglasses: I love these. My in-laws actually bought my husband a pair and we used them as our toasting flutes at our wedding. No we did not have a rustic wedding in a barn. Even though I would have love to. We actually had a very elegant wedding, but the glasses brought the little touch of southern that is in both of our hearts. They were perfect.
4. Mason Jar Invitations: Love these invitations? Guess what… They are FREE! Yep FREE! Just go to The Wedding Chicks and print them off for $0. They have tons of other free printables and downloads.
5. Wedding Signs: Wedding signs of all shapes and sizes are fantastic. And you don’t have to have a rustic wedding to make them work. No matter what your theme is, There are tons of places throughout your event to use signs. You can make them yourself with a little work and creativity, or you can go to etsy.com and find a vendor you like to make them for you. I love Etsy!
Save the Dates
January 17, 2012 by Leave a Comment
Now that the holiday dust has settled, it is time for all those newly engaged brides to start planning their weddings. First thing on the agenda… Pick a date and tell people to save it! I think one of the most important details that sometimes gets overlooked is Save the Dates. You need to give your guests ample time to plan and prepare for your big event, especially if you are inviting a lot of out of towners. You would hate for someone not to be able to come, because they had a prior commitment. There are tons of fun, creative and inexpensive Save the Date options out there. Check them out!

1. Photobooth Strip: This is a super cute and fun option. It is a way of incorporating a picture of the newly engaged couple without delving out big bucks for a professional photographer. It is also a great way to give your guests a sneak peek into your wedding if you plan on having a photobooth at the reception.
2. Concert Poster: This is great Save the Date for music lovers. It is also a fantastic DIY project if you’ve got some time on your hands to design it yourself. Maybe you can make concert tickets to send as the actual invitation. Not feeling super creative today? No worries. Go to Linzmarie Designs and have Lindsay Zogas create one for you.
3. Pencil Us In: Don’t want to us a picture of you and your fiance? No problemo. This is great option that will still catch your guest’s eye without having to look cute in front of a camera. Get this option now on Etsy.
4.Caricature Magnets: I love these. I think they are so much fun and they stick to the fridge for fun and easy display. Check out Pose Prints and create your own personalize caricature Save the Date. They also make other stationery, like cards, note pads, business cards and even wedding programs.
5. Themed Cards: These are soooo much fun for anyone infatuated with the 50’s inspired tv show. But wait… You have not heard the best part yet… They are FREE! Yep… That’s right… FREE! Just go to The Wedding Chicks and download your own personalized Save the Date template.
6. Personalized Hot Sauce: These are great for lovers who want to share a little spice with their guests, or maybe for the bride and groom who are planning a rustic western inspired wedding, or maybe you just like the idea. You can get personalized hot sauce, bbq sauce, marinades dipping oils, anything really. Check them out on Etsy.
Inspiration Board – Nautical Wedding
January 16, 2012 by Leave a Comment
 1. Anchors Away Welcome Wedding Tote: Go to The Wedding Chicks Shop to personalize and purchase your own tote.$10 each or a set of 20 for $100. Sounds like a great deal to me!
2. Origami Boat Place Card: Go to Martha Stewart Weddings to learn how to set a shipshape table with paper-boat place cards.
3. Nautical Wedding Cake: A good cake can be hard to find. Especially this one, since it was made by Cake Occasions located in Australia. If you love it, have to have it, but aren’t an Aussie, just take the picture for inspiration into a reputable cake designer in your area… I am sure you can find someone who can create what you are looking for.
My Northern California Wedding
January 8, 2012 by Leave a Comment
 My Wedding at a Glance
My wedding day was the most wonderful day of my life. Everything went wonderfully and was absolutely beautiful! I could not have asked for more, but of course I am a little biased. I do, however, take credit for the entire thing. I did have a “day of” wedding planner that took everything over the week before and ran the actual event, but other than that, I planned the entire thing all by myself. It was so much fun and I loved every moment of it. So much that even though I love my husband to death, I would totally get a divorce just so I could plan another wedding. Maybe I should spare hearts and just become an event planner.
The Dresses
 I knew I wanted my dress months before I ever put it on. It was love at first sight and could not imagine wearing anything else, considering everything else in the wedding was centered around it. The invitations, the cake, the flowers, everything was inspired by my beautiful flowered skirt wedding gown. It was designed by Jenny Lee in Newport Beach, CA. It is from her Spring 2011 collection, however I changed the color from ivory to white and made it a sweetheart neckline. It was perfect! For the girls I decided to put the bridesmaids in purple and my junior bridesmaids and flower girl in a soft pink. All the dresses were the same satin finish with their own version of bow on the back. The flower girl’s skirt pink rose petals floating inside her skirt and little white shoes with a flower poof on the toe.
The Accessories
 When it comes to jewelry, I am a minimalist. I am not one for necklaces or pearls. I decided to wear an old pair of clip on costume jewelry earrings that of course mimicked the roses on my dress. For my bridesmaids, I wanted them blinged out. They all wore beautiful (fake) diamond encrusted earrings, necklaces and cocktail rings to match their blinged out dresses. For shoes, I wanted all of us to match, so my girls wore a black pair of close toed heels and I wore the matching pair in purple of course. I even got my Hubby to wear a pair of pink and purple socks. Lets just say I pay a little too close attention to detail sometimes. I also had a fabric flower in my hair that I had made special by a friend to match my dress. When the bridal party got to the reception, the bridesmaids were given pink parasols to use for our grand entrance. Instead of a normal bridal party entrance, where everyone is introduced and usually tries to do something funny, but ends up being too long and little awkward, we decided to hire a jazz band and do a Second Line into the room. It was perfect, because it fun and upbeat and definitely got the party started on the right foot. Plus we got to use the parasols as the perfect backdrop for our kings table. Halfway through the night the Hubby and I did a costume change for our first dance. We danced to “Time Of My Life” and did the choreographed dance from Dirty Dancing. I wore a short white dress with Mary Jane dance shoes that I stuck little Swarovski crystals all over. It took about 4,000 crystals and weeks to finish, but it was so worth it. Totally adorable! For our toasting flutes we used these awesome mason jar wine glasses. It was a touch of my country girl soul poking out of a very elegant affair. Thanks to my in-laws for those.
The Bouquets
 My brooch bouquet was possibly my most favorite thing about my wedding, except for my dress of course. My mother in law made it for me to use at my rehearsal dinner, however, I loved it so much I decided to use it for the actual wedding. It was far too beautiful, both inside and out, to be wasted on the rehearsal. Along with her beautiful brooches, she got all the important women in my life to add to it. It is absolutely amazing, and I will cherish it forever.
The Flowers
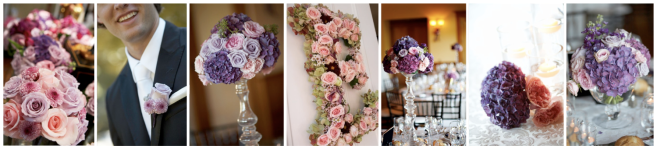 Obviously I did not need any flowers, thank God, because I wanted peonies, but I got married in late October, and it is very hard to find peonies in October. Somehow my amazing florist, Jeeryn of Tanjeeryn Designs, was able to find just enough for my girls. The bouquets were a beautiful mix of pink peonies and purple hydrangeas. The flower girl carried a pomander of purple mums. The boys had boutonniere with pink and purple roses accented with corresponding mums and greenery. One of my favorite touches, that I am sure a lot of people did not even notice, was our initials made out of flowers on the church doors.
The Stationery
 As I said the invitation was totally inspired by how it mimicked my wedding dress, but I fell in love with fullness that the purple gave the pink. Originally I wanted a pink and green wedding, but after I saw this gorgeous invitation suite by Sarka, of Citrus Press, the green was out and it was purple and pink all the way. I used the invitation design on everything from the table numbers and wedding programs to the menus and escort cards. Sarka was amazing and worked so hard to give me exactly what I wanted. The uniformed details were seamless.
The Favors
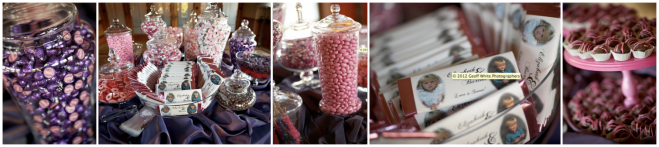 We had the most amazing favors. Not only were they adorable and useful, but there was a very special meaning behind them. My Hubby asked me to marry him while playing cards with my family. He discarded a joker with the words, “Will you marry me?”, written on it. It was perfect. So for our wedding favors, we had personalized decks with our picture on it made. We also had a pink and purple candy bar, which served as both decoration and favors. I made personalized Hershey Bar wrappers with our pictures on them and Hershey Kiss labels with our names on them. I know what you are thinking… And yes, I glued about 500 Hershey Kiss labels the week before the wedding.
The Cakes
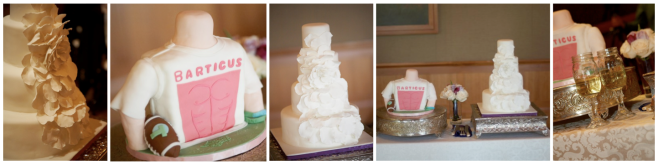 I am not a cake person, but I loved everything about my Wedding Cake. Even the way it tasted, which is surprising. I did a little something different for my cakes. I decided to have a fake Wedding Cake made, that had one real pink lemon flavored layer for us to cut at the wedding. The rest of the cake was made out of styrofoam. We then had multiple flavors of sheet cake in the back that we used for serving. This worked out great, because they not only was it cheaper, but I got to keep the top styrofoam part of the cake and have it on display in my house. It gives a whole new meaning to the tradition of saving your wedding topper. We also had a Groom’s Cake. If you are not from the South, you might not know what that it is. In the South it is very common to have what is known as a Groom’s Cake. It is usually a fun flavor like chocolate or red velvet, and it tends to be decorated in a way that represents the Groom. Both of my cakes were made by Venus, of La Vie Douce Design. She did an amazing job replicating the cake I wanted. Perfection!
Well that pretty much sums up my wedding. I hope you enjoy, and if you are planning a wedding yourself, ohhhh how I envy you! Good Luck!
Progress, Money & Luck… Sounds Good To Me!
January 8, 2012 by Leave a Comment
 Well as I promised, The Hubby wrote a post about his delowcious New Years Day Dinner that he cooked all by himself. Man I wish I would have documented the play by play. I am sure it would have been very entertaining. Surprisingly, everything tasted really good. Not that I did not have complete confidence in my Hubby, but I am not the biggest fan of the items on the menu. Pork, Turnip Greens and Black Eyed Peas. (The food not the music group mind you… Either way, I don’t like either of the them. Or at least I did not think I did.) Well, without further adue, I present to you, my husband. Enjoy!
New Years Dinner
Written By: The Hubby
 So since I had yet to cook in this marriage, and it was New Years Day, I figured why not. It was a good way to celebrate the fact that we have eclipsed the marriage threshold of 72 days set by Kim K. Plus, I don’t mind cooking every once in a while, because at least then I know whose hair is in my food.
Now I am not one to simply leave 2012 up to chance. No I feel as if destiny is what you make it. And when you make: Pork, Turnip Greens, and Black Eyed Peas, then your destiny is progress, money, and luck in that order.
I have truly attempted to make one of these items in my entire life, black eyed peas, and from what I could remember, they turned out well. (The opening of the can went off without a hitch and the heating of the beans went fairly well with a nice consistent heat throughout.) Below is my attempts at all three on the first day of 2012.
Pork
With no experience in the area of pork, I set out in search of a pork recipe in the world’s largest recipe book, the internet. My initial thought was to look for a roast recipe as opposed to say chops, because I had intentions of cooking this pork dish within my much beloved Dutch Oven. (Note to anyone who is a novice cook, if you can find a recipe that involves a Dutch Oven, USE IT! Nothing is able to cover up your inexperience better than a Dutch Oven.) Nothing really seemed to be what I was looking for, especially the portion size, as most pork roasts dishes call for 4 to 5 lb roast. I was looking for something smaller, as I know the old lady had no plans of eating any of these dishes. She’s not a fan of Pork or Greens, thus the reason I was cooking. I was able to get a lean cut of pork loin from my local grocery store butcher that weighed in at 2 lbs. The following recipe is one I developed to use with said 2 lb roast.
Ingredients
- 2 lb. Pork Loin
- 1 whole cooking onion (yellow onion)
- 1 whole red delicious apple
- 2 tbsp of butter
- Salt
- 3 cloves of garlic
- ½ cup of Apple Cider Vinegar (If you are not a vinegar fan, substitute 1 cup of Apple Juice in place of the ½ cup of apple cider vinegar.)
Directions
- Pre-heat oven to 350 degrees.
- Run pork loin under hot water for a quick clean.
- Mince Garlic Cloves.
- Cut small slits in the top of the roast. (This roast will be cooked fat side down so thus the side without the fat layer is the top.)
- Insert about half of the garlic into the slits cut into the roast.
- Melt butter and the remaining garlic in a small microwavable cup or dish for approximately 30-45 seconds.
- Pour melted butter and garlic mixture over roast and rub into top.
- Place roast into Dutch Oven.
- Chop onion into thin rings.
- Chop apple into thin slices.
- Place chopped apples and onions on top and around the roast in the Dutch Oven.
- Pour the Apple Cider Vinegar over the roast.
- Place top on the Dutch Oven and cook for approximately 1 ½ hours, basting the roast in its own juices every 30 minutes or so.
- Make sure to check the roast with a meat thermometer to assure that the internal temperature has reached a minimum of 160 degrees F. For pork 160 degrees is considered to be done while 170 degrees is considered to be well done.
- Once the roast is finished let it sit for approximately 10 minutes before cutting.
Greens
As I expect many are, I am not the biggest fan of greens (or turnip greens in this case) unless they are truly southern greens. And southern greens to me means bacon and onions. So when I found the following recipe for southern style greens on epicurious. It is by Leon’s “World’s Finest” In & Out B-B-Q House, on Galveston Island. I figured it would work, and it probably would have had I known what I was doing. The greens ultimately were great if they were greens. They ended up being mostly onions and bacon, which is not a bad thing, but it could have been better. Below I listed a few lessons learned, so you don’t make the same mistake.
There were two issues I had, and both were with the greens themselves.
- I only used one bushel, or set, or wrap or whatever you call it, of turnip greens from the grocery store. I would say that you likely need three of these to complete this recipe. It will seem like quite a bit at first, but the greens will cook down a lot. Trust me!
- When cooking the greens check them several times to make sure they reach the proper tenderness. I over cooked them (leaving them in the boiling water approximately 19 minutes). I would estimate the 15 minutes is the appropriate amount of time or maybe a little less.
So hopefully through my mistakes, yours will turn out better and actually be greens. The recipe is as follows:
Ingredients
- 1 large bunch turnip greens
- 1 small turnip, peeled and diced
- Dash of sugar
- 6 slices bacon, diced
- 1 onion, diced
- 1 tablespoon lemon pepper
- Salt to taste
- Louisiana hot-pepper sauce
Directions
Wash the greens in several changes of water in the sink until no more grit is seen. Chop the greens coarsely. Bring a large pot of water to boil and add the greens, the turnip, and the sugar. Cook for 12 to 15 minutes, or until tender. Drain.
In a large skillet, sauté the bacon until it gives up its grease. Add the onion and cook 7 minutes until the onion is soft. Toss the greens with the bacon and onion. Add the lemon pepper and salt. Serve with Louisiana hot-pepper sauce.
Black Eyed Peas
Now for the difficult part, the Black Eyed Peas.
Ingredients
- 1 can of Black Eyed Peas
- Your favorite hot sauce
Directions
Open can of Black Eyed Peas. Add to pot on stove top set at simmer. Add a dash of hot sauce. Cook until warm.
Happy New Year!
Popping The Question!
January 6, 2012 by Leave a Comment
After getting a very good response from my Will You Be My Bridesmaid? post last week, I decided to do another post giving more fun and creative ideas on how to pop the question to your gals without breaking the bank. There are many free websites out there that not only offer fun DIY ideas, but also offer free downloads. One of my absolute favorite resources is The Wedding Chicks. Here’s a taste of what they offer…
 Free Downloads
Now don’t be afraid to get creative. not only can you print these out and give them to your gals as cards, but you can do sooooo much more with them. Have them put on a coffee mug, or print out their initial in the monogram section and iron it on a shirt so all the ladies match as you get ready on the big day. You can even make them their own personal tote bag to hold all of their ‘Thank You For Being My Bridesmaid Goodies.” One of my favorite things about these printables is that they are all fully customizable. Change the color of the design and the writing to match your wedding colors or if you are a super accommodating bride pick their favorite colors to personalize them even more. Sorry girls… I guess I am not an accommodating bride. I like my ladies to match. It is just my thing, but I am sure someone out their will like this option.
 All this talk about the ladies, I almost forgot about the dudes. Yes, guys can ask their buddies to be their groomsmen in fun and creative ways too. It does not have to be girly to be DIY. There are many manly, yet still unique ways to ask the boys to be a part of such a special day. One of my faves was created by Stephanie, of Stephanie Hunter Photography. Stephanie loved The Wedding Chicks free printables, but did not want to settle for using them as just cards. She wanted something that really read into her and her fiance’s style and something that their friends would love, so she thought outside the box and came up with the Will You Be My Groomsmen Bottle Lables. I think this idea was phenomenal and I honestly wish I could ask our friends all over again. It is so perfect on so many levels. Maybe your guy really likes beer (what guy doesn’t), or better yet maybe he brews his own at home… Print out one of The Wedding Chicks free “Will You Be My Groomsmen” cards on some adhesive paper and turn it into a personalized 6 pack of brews for his buds.
 What was that ladies… You like beer too? No problemo! The Wedding Chicks have got the chicas covered as well. Print out your own Will You Be My Bridesmaid Bottle Labels and make your own matching six-pack for the ladies. Use beer, spiked lemonade, wine, or root beer… Anything in a bottle really. Now you’ve got your bottles, but how do you hand them out. It is sort of hard to mail a six-pack. Maybe plan a party for your friends and give them all at the same time. This way all your attendants find out at the same time and get a chance to meet/know each other better before the big day. Plus you get to have a party and I am always looking for excuses to have one of those. This idea is great for theme loving brides. Come on… You know who you are… You worry about every single little detail and want everything to match and stay within in the wedding theme. This project is perfect for you. Enjoy!
Don’t forget to check out The Wedding Chicks’ other FREE PRINTABLE WEDDING TEMPLATES!
Will You Be My Bridesmaid?
January 2, 2012 by 3 Comments
 When it came to asking my wonderful friends and family to be a part of my wedding party, I wanted it to be special. I didn’t want to just call them up and ask, or take them to lunch where they would totally know what was up. I wanted them to be surprised and feel very special. Plus I wanted them to have a keepsake they could have and remember forever how I asked them… Ok ok ok, I also wanted them to be totally impressed with my awesome DIY abilities.
I came across these amazing paper chain dolls dressed for the occasion, accompanied with a thoughtful and eloquently written card asking them to be my bridesmaid. I wish I would have documented the ones I made for my girls, but 8 months ago I did not know I would be writing a blog about my DIY projects. The project I followed was created by Anna Bond of Rifle Design, and I found it on the Once Wed website. I hope you enjoy!
Supplies
- Craft paper (for clothes & hair),
- Paper for bodies
- Envelopes
- Ruler
- Scissors
- Pencil
- Eraser
- Glue stick
Directions

First, be sure that your chain will fit in the envelope you chose. I decided to make my chain about 6 inches tall and 3.5 inches wide to fit in an A7 envelope. Draw tick marks every 3.5 inches (or whatever width you chose) on the top and bottom of the paper for how many people you want to cut out.


Cut out your rectangle and score the paper vertically between each set of tick marks. This will make folding easier and more accurate. Then, fold the paper accordion style.

On the top of the stack draw the shape of your person. Be sure to draw the arms and legs to the edge of the paper so that they will be attached into a chain after you cut it out.


Next, cut out the person shape and open up your masterpiece chain! Decorate your ladies with dresses of your choice and different hairstyles to personalize them. You can also draw faces and pain their names on each one.

To complete the set wrap a band of paper around the chain and information card, and write the name of the person you are sending it to.
Cowboy Chic Couple’s Shower
December 29, 2011 by 3 Comments
Both of my Maids on Honor threw me the most amazing Couple’s Wedding Shower last summer. One of the most amazing things they did was they let me help. I get so excited about these types of things and wanted to try out some of my DIY ideas that I knew where not going to fit in with my wedding theme. I tried my best not to take over or be too controlling, because honestly this was their party and they were doing me a favor by letting me be involved.
Couple’s Cowboy Chic Shower Inspiration Board

Step 1: Pick a theme
Even though I am a California girl, I am a country girl at heart and had spent most of my adult life in Texas. Plus I was marrying an Alabama boy, so a southern theme was a no brainer. I decided to make it a little girly and call it Cowboy Chic, which really just means wear a dress and some cowboy boots and call it good.
Step 2: Pick a location
My grandmother was ever so generous to let us use her beautiful backyard. One of my favorite movies has always been Father of the Bride and I always wanted to get married in my grandmothers backyard or at least have the reception there. I knew that would never work, so I figured having a shower there would be the next best thing. Plus I did not have to travel very far once I got my dress on.
Step 3: Pick a date
Duh… but harder than you think. Accept the fact that you cannot accommodate everyone’s schedule. Impossible!
Step 4: Invitations
I scoured the internet for western themed ideas and pulled from various sources to finally come up with our finished product. I made them myself in PowerPoint. It would have been nice to have some higher tech software, but I made do with what I had. Maybe someday… I got the invitation paper from Michaels for like $10 (I had a 40% off coupon) and printed them off at home. It was so easy and fun!
Step 5: Decor
There were a couple of signature things I knew I wanted right away… I had been eyeing the Martha Stewart Pom Poms for a while and knew how fabulous they would look in my backyard in shades of pink. I think I ended up making about 50 of them. I loved them so much I could not bare throw them away after the party. We ended up saving them and used some for the rehearsal dinner, some on a sign my grandmother had made for us, and I even used a 3 of them as my bouquet at the rehearsal. The second item on the decor list was Mason Jars. We used the larger ones as vases on tables filled with Peonies and Sunflowers (Peonies are not cheap) and the smaller jars we used as drink glasses. You could fill them with your choice of liquor, Shiner Beer, Pink Signature Drink, Sweet Tea or wine (My girlfriend had labels made with our baby pictures put on the bottles. It was adorable and possibly my favorite detail at the party!)
Step 6: Food
Since it was a country, western, southern, cowboy chic, whatever you want to call it party, we had to have BBQ. We ordered the best California BBQ you can find (which is hard) and went to Armadillo Willy’s. I smuggled some Rudy’s BBQ Sauce home from Texas and had some friends make corn bread muffins and homemade potato salad. For dessert we had non other than warm apple pie and cold vanilla ice cream. Mmmmm I am getting hungry just talking about it. It was absolutely delowcious!
Step 7: Favors
What is a party without favors? We made little S’More Favors for each guest with little personalized tags that said, “S’MORES, Y’all!”
Notes: It turned out to be a great party. We had way too much alcohol and food left over due to my fear of never having enough (sorry girls), but other than that no complaints here. It was fabulous and the girls did an amazing job. Thank you from the bottom of my heart.
